
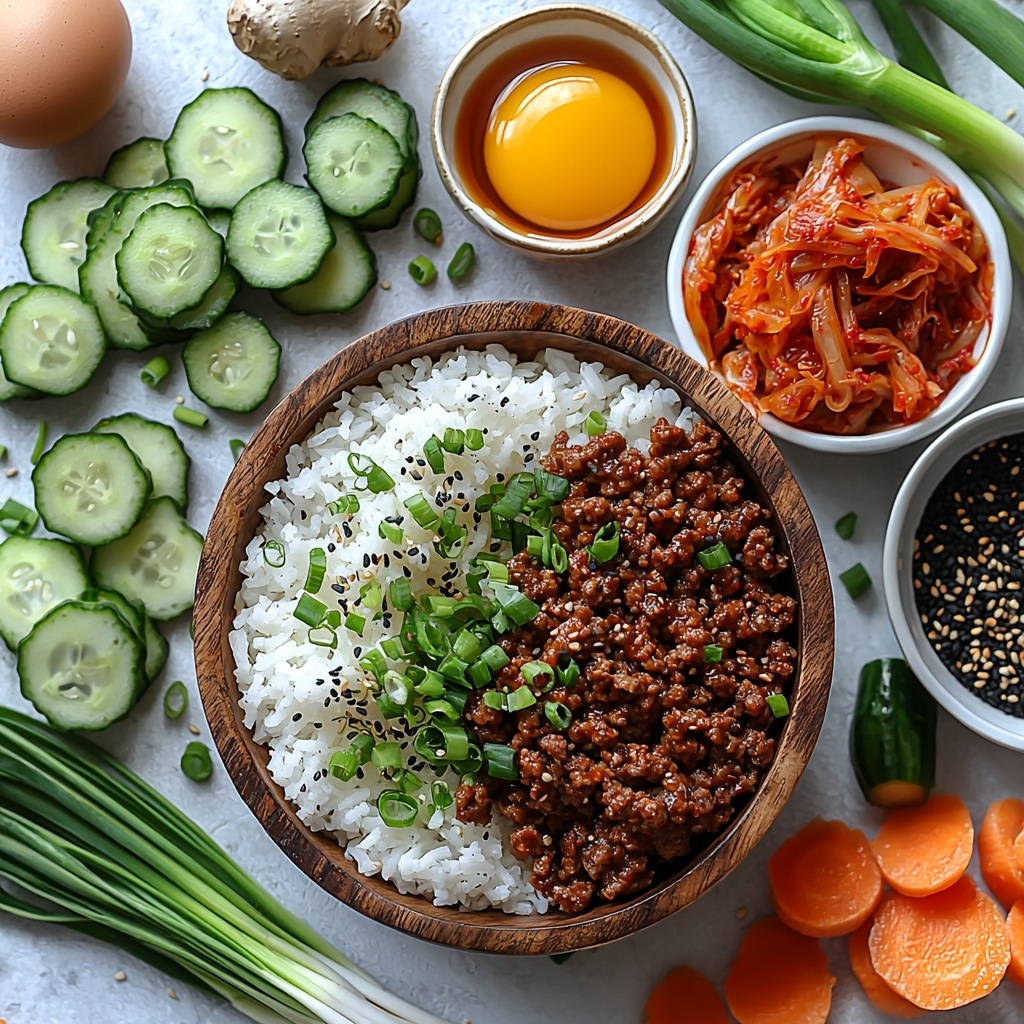
If you’re craving a burst of savory, sweet, and umami flavors all in one bowl, this Korean Ground Beef Bowl Recipe is going to become your new go-to dinner. It’s a quick, comforting dish packed with tender ground beef coated in a glossy, soy-sesame sauce, layered over fluffy rice, and topped with bright, crunchy garnishes that add freshness and zing. Perfect for weeknight dinners or impressing friends without hours in the kitchen, this recipe combines simple ingredients to create something truly satisfying and addictive.
Ingredients You’ll Need
This Korean Ground Beef Bowl Recipe shines because of its straightforward ingredients that work beautifully together. Each element is essential to building a balance of flavors, textures, and colors that genuinely bring the dish to life.
- Ground beef (1 pound): Using 80/20 fat content ensures juicy, flavorful beef that won’t dry out during cooking.
- Soy sauce or tamari (2 tablespoons): The salty-sweet umami backbone that flavors every bite; tamari is great for a gluten-free option.
- Sesame oil (1 tablespoon): Adds a fragrant, nutty aroma and richness that’s signature in Korean cooking.
- Garlic (3 cloves, minced): Infuses the beef with a warm, aromatic punch that wakes up the palate.
- Fresh ginger (1 teaspoon, grated or minced): Lends a subtle zing and earthy brightness.
- Green onions (2, chopped): Provide a fresh, slightly sharp bite, with some reserved for garnish to add color and crunch.
- Salt and pepper: To taste, balancing and enhancing all other flavors.
- Cooked rice (2 cups): Use white, jasmine, or brown rice as the perfect neutral base to soak up all the delicious beef flavors.
- Sesame seeds: For a toasty garnish that adds crunch and a subtle nutty note.
- Sliced cucumbers: Crisp and refreshing, they bring a cooling contrast.
- Kimchi: A classic Korean side that introduces tangy spice and fermented goodness.
- Sunny-side-up egg: A luscious, runny yolk topping to make every bite velvety and rich.
- Pickled carrots or radish: Adds a vibrant pop of color and a sweet-tart balance.
How to Make Korean Ground Beef Bowl Recipe
Step 1: Prepare the Aromatics
Start by finely mincing the garlic and grating or mincing the fresh ginger. These aromatics form the fragrant foundation of our Korean Ground Beef Bowl Recipe, which will infuse every bite with vibrant, warming flavor. Make sure your green onions are chopped as well, reserving a little for garnish later on.
Step 2: Cook the Ground Beef
Heat a skillet over medium-high heat and add the ground beef. Break it apart with a spatula, cooking until it starts to brown but still retains some moisture—this ensures a tender, juicy texture. Drain any excess fat if you prefer a leaner result, though a bit of fat adds richness to the dish.
Step 3: Add Aromatics and Sauce
To the browned beef, stir in garlic, ginger, and chopped green onions. Sauté these together briefly until fragrant, about 1 to 2 minutes. Then, pour in the soy sauce and drizzle the sesame oil over everything. Stir well to coat the meat completely. Let it cook a few more minutes so the sauce thickens slightly and the flavors meld.
Step 4: Season and Finish
Taste your beef and season with salt and pepper as needed. Remember, soy sauce already provides saltiness, so go light at first. This step is key to balancing the dish perfectly. Once seasoned, remove from heat and keep warm.
Step 5: Cook the Rice and Eggs
While the beef finishes, ensure your rice is cooked and warm—this will be the comforting base of your bowl. If you want to take it up a notch, fry up some sunny-side-up eggs with runny yolks, an indulgent topping that complements the savory beef beautifully.
How to Serve Korean Ground Beef Bowl Recipe
Garnishes
Garnish your bowl with a sprinkle of toasted sesame seeds and reserved green onions to add a lively crunch and visual appeal. The fresh slices of cucumber and dollops of kimchi inject that cold, tangy contrast, cutting through the richness perfectly. Don’t forget a carefully placed sunny-side-up egg to crown the dish, adding luscious creaminess when broken.
Side Dishes
This Korean Ground Beef Bowl Recipe pairs wonderfully with simple sides like steamed or sautéed vegetables, and if you love a little more heat, serve alongside extra spicy kimchi or pickled radishes. These sides add layers of texture and flavor, transforming a humble bowl into a satisfying feast.
Creative Ways to Present
For a fun twist, serve this dish in individual stone bowls or bibimbap-style, allowing guests to mix everything together before eating. You could also set out an assortment of pickled veggies as a build-your-own bar, letting each person customize their bowl just the way they like it. The visual pop from colorful garnishes makes it a guaranteed crowd-pleaser.
Make Ahead and Storage
Storing Leftovers
Once cooled, store any leftover beef mixture separately in an airtight container in the refrigerator. Cooked rice should be stored in a separate container to keep its texture intact. Properly stored, leftovers will stay fresh for 3 to 4 days.
Freezing
The cooked ground beef mixture freezes very well. Portion it into freezer-safe containers or bags, and it will keep for up to 2 months. Rice can be frozen too, but it’s best to thaw and reheat it gently to avoid dryness or clumping.
Reheating
Rewarm the beef mixture in a skillet over medium heat, stirring occasionally until heated through. Warm the rice separately, ideally with a sprinkle of water to retain moisture. If you want to include eggs, fresh frying is recommended for the best texture and flavor.
FAQs
Can I use ground turkey or chicken instead of beef?
Absolutely! Ground turkey or chicken can be substituted for a leaner version. Keep in mind that these meats have less fat, so you might want to add a touch more sesame oil to maintain that rich mouthfeel.
Is this recipe gluten-free?
It can be if you use tamari instead of soy sauce, as traditional soy sauce contains gluten. Tamari offers a similar depth of flavor with a gluten-free profile, making this dish accessible to more people.
How spicy is this Korean Ground Beef Bowl Recipe?
This recipe is mildly flavored without much heat, making it very approachable. If you love spice, you can easily add gochujang (Korean chili paste) or a sprinkle of red pepper flakes to the beef mixture or as a side condiment.
Can I prepare components ahead and assemble later?
Yes! You can cook the beef and rice in advance, then assemble the bowls fresh when ready to eat. Keep garnishes like cucumbers and kimchi fresh until serving for the best texture and flavor.
What rice works best for this dish?
Jasmine rice is an excellent choice for its fragrant aroma and fluffy texture, but classic white or nutty brown rice also work wonderfully. The key is to have warm, well-cooked rice as the base to soak up the flavorful beef sauce.
Final Thoughts
Give this Korean Ground Beef Bowl Recipe a try and you’ll see how easy it is to bring authentic Korean-inspired flavors to your table with minimal fuss. It’s a fast, flavorful, and endlessly customizable dish that welcomes you back again and again. Whether for a cozy night in or to impress friends, this bowl is sure to become a cherished kitchen staple.
Print
Korean Ground Beef Bowl Recipe
- Prep Time: 10 minutes
- Cook Time: 15 minutes
- Total Time: 25 minutes
- Yield: 4 servings
- Category: Main Course
- Method: Stovetop
- Cuisine: Korean
Description
This Korean Ground Beef Bowl is a quick and flavorful dish featuring savory beef cooked with garlic, ginger, and soy sauce, served over steamed rice and topped with fresh garnishes like sesame seeds, green onions, cucumbers, kimchi, pickled vegetables, and a sunny-side-up egg for the perfect balance of textures and flavors.
Ingredients
Beef Mixture
- 1 pound ground beef (80/20 preferred)
- 2 tablespoons soy sauce (or tamari for gluten-free)
- 1 tablespoon sesame oil
- 3 cloves garlic, minced
- 1 teaspoon fresh ginger, grated or minced
- 2 green onions, chopped (save a bit for garnish)
- Salt and pepper to taste
To Serve
- 2 cups cooked rice (white, jasmine, or brown rice)
- Sesame seeds, for garnish
- Sliced cucumbers
- Kimchi
- A sunny-side-up egg
- Pickled carrots or radish
Instructions
- Prepare the Beef: In a large skillet over medium heat, add the sesame oil. Once hot, add the minced garlic, grated ginger, and chopped green onions, sautéing just until fragrant, about 1-2 minutes.
- Cook the Ground Beef: Add the ground beef to the skillet, breaking it apart with a spoon. Cook until browned and no longer pink, around 6-8 minutes. Season with salt and pepper to taste as it cooks.
- Add Soy Sauce: Pour in the soy sauce (or tamari for gluten-free option) and stir well to combine with the beef mixture. Cook an additional 1-2 minutes, allowing the flavors to meld.
- Prepare the Rice and Garnishes: While the beef cooks, prepare your rice if not already cooked. Slice cucumbers, set aside kimchi and pickled carrots or radish, and fry your sunny-side-up eggs in a separate pan until whites are set and yolks remain runny.
- Assemble the Bowls: Divide cooked rice evenly between four bowls. Spoon the seasoned ground beef over the rice. Top each bowl with a sunny-side-up egg, sliced cucumbers, kimchi, pickled carrots or radish, and garnish with remaining green onions and sesame seeds.
Notes
- You can substitute ground turkey or chicken for the beef to make a lighter version.
- Use tamari instead of soy sauce to make this dish gluten-free.
- The sunny-side-up egg adds richness, but you can omit or replace it with a fried or poached egg.
- Customize the garnishes based on your taste preferences and what’s available.
- For a spicy kick, add a drizzle of gochujang (Korean chili paste) or sprinkle red pepper flakes.


