
If you’re craving a dessert that combines creamy richness, peanut butter bliss, and the perfect pop of chocolate without turning on the oven, you have to try this No-Bake Peanut Butter Cheesecake Balls Recipe. These little bites are an absolute game-changer for anyone who loves a sweet treat that’s super easy to whip up yet bursts with flavor and texture. Soft, velvety peanut butter cheesecake rounds meet a crisp chocolate shell that melts in your mouth, making every bite feel like a celebration. Whether for a casual snack, a party dessert, or a quick indulgence, these cheesecake balls deliver on delight without any fuss.
Ingredients You’ll Need
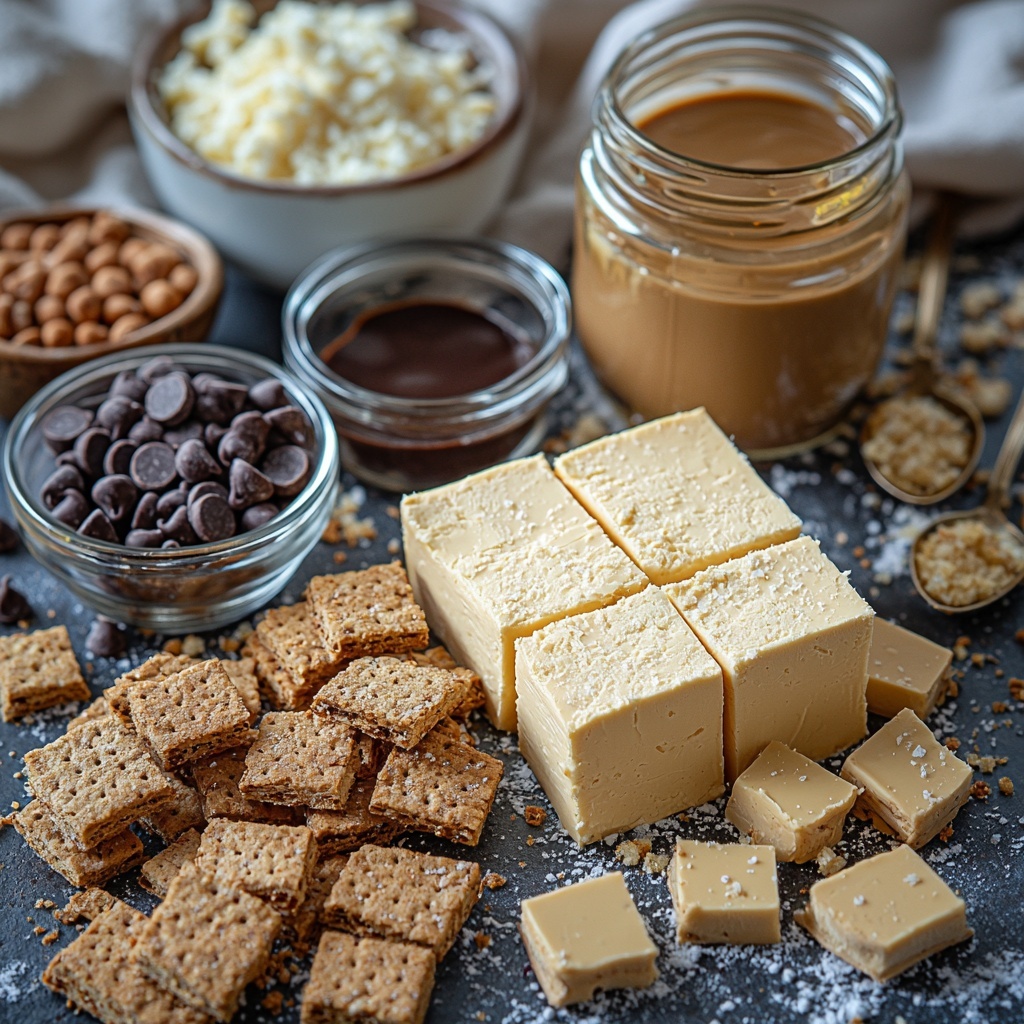
For this No-Bake Peanut Butter Cheesecake Balls Recipe, you don’t need a pantry full of fancy items. The ingredients are simple but each plays an essential role in creating that luscious, balanced flavor and perfect texture you’ll fall in love with.
- Cream cheese: 8 ounces of softened cream cheese provide the rich, smooth cheesecake base that’s wonderfully creamy.
- Creamy peanut butter: 1 cup, for that nutty, velvety taste that’s truly the star of the show.
- Powdered sugar: ½ cup, to add just the right amount of sweetness without graininess.
- Vanilla extract: 1 teaspoon, boosting the flavor with a warm, inviting aroma.
- Graham cracker crumbs: 1½ cups, which give body and a subtle honeyed crunch to the bites.
- Chocolate chips: 10 ounces of semi-sweet or milk chocolate, perfect for dipping and creating that luscious chocolate coating.
- Coconut oil or butter (optional): 1 tablespoon, to help melt the chocolate smoothly and give it a shiny finish.
- Optional garnishes: crushed peanuts, additional graham cracker crumbs, or flaky salt, to finish with texture and a burst of flavor contrast.
How to Make No-Bake Peanut Butter Cheesecake Balls Recipe
Step 1: Combine the Cheesecake Base
Start by beating the softened cream cheese, creamy peanut butter, powdered sugar, and vanilla extract together in a large bowl. This mixture should become silky smooth and completely combined before you add anything else. Getting this base nice and creamy is key to how luscious your cheesecake balls will be.
Step 2: Add the Graham Cracker Crumbs
Once your base is smooth, gently stir in the graham cracker crumbs. This addition thickens the mixture into a dough-like consistency that you can scoop and shape. The crumbs lend a subtle crunch and flavor depth that complements the richness beautifully.
Step 3: Chill the Mixture
Pop the bowl into the refrigerator for 30 to 60 minutes. Chilling helps the mixture firm up so it’s easier to handle and shape into perfect balls without sticking all over your hands.
Step 4: Shape Into Balls and Freeze
After chilling, scoop out small portions—about 1 inch each—and roll into smooth balls. Place them on a parchment-lined baking sheet and freeze for 15 to 20 minutes. This step ensures the balls hold their shape during the chocolate dipping process.
Step 5: Prepare the Chocolate Coating
While the balls chill, melt the chocolate chips with the optional coconut oil or butter in a microwave-safe bowl. Heat in short 30-second bursts, stirring well after each until the chocolate is silky and smooth. This smooth melt will make dipping easier and give a glossy finish.
Step 6: Dip and Garnish
Using a fork or toothpick, dip each chilled ball into the melted chocolate, letting the excess drip off lightly. Return the coated balls back onto the lined sheet and immediately sprinkle your choice of crushed peanuts, graham cracker crumbs, or flaky salt on top. Let them chill again in the refrigerator until the chocolate shell is set and firm.
How to Serve No-Bake Peanut Butter Cheesecake Balls Recipe
Garnishes
Adding garnishes isn’t just about looks—it’s about creating contrasting textures and bursts of extra flavor. Crushed peanuts add crunchy nuttiness, graham cracker crumbs bring a warm, crumbly texture, and flaky salt sharpens the sweetness perfectly. These little details elevate your cheesecake balls from simple to show-stopping.
Side Dishes
Serve these cheesecake balls alongside fresh fruit like sliced strawberries or apple wedges for a bright, refreshing counterpoint, or add a dollop of whipped cream for an extra creamy touch. If you’re feeling decadent, pair them with a scoop of vanilla ice cream and a drizzle of caramel sauce for a dreamy dessert trio.
Creative Ways to Present
Presentation is half the fun! Try placing the balls on mini cupcake liners or arrange them on a pretty platter with fresh mint leaves for a pop of color. For gatherings, serve in a glass bowl with layers of crushed graham crackers or chocolate shavings for a dessert you can dig right into. You can even thread them on decorative skewers to make peanut butter cheesecake pops!
Make Ahead and Storage
Storing Leftovers
Keep your No-Bake Peanut Butter Cheesecake Balls in an airtight container in the refrigerator for up to one week. This storage method ensures they stay fresh, creamy, and delicious, ready for whenever you want that perfect bite of indulgence.
Freezing
If you want to make these ahead for parties or just stash some away, they freeze wonderfully. Store them in a single layer on a parchment-lined tray frozen for a few hours, then transfer to a resealable freezer bag. They’ll keep well for up to three months—just thaw in the refrigerator before serving to enjoy their signature creamy texture.
Reheating
Since these are served chilled, no reheating is necessary. Just bring them to room temperature or serve straight from the fridge for that cool, refreshing feel. If you want the chocolate shell slightly softer, leave them out for about 10 minutes before enjoying.
FAQs
Can I use crunchy peanut butter instead of creamy?
Absolutely! Using crunchy peanut butter adds a delightful texture contrast inside the balls, giving an extra nutty surprise in every bite. Just be sure it’s well-mixed to avoid lumps.
What chocolate works best for dipping?
Semi-sweet or milk chocolate chips are ideal for the classic balance, but feel free to experiment with white or dark chocolate to tailor the flavor to your preference. Adding coconut oil or butter helps achieve that smooth, glossy coating.
How long do these cheesecake balls last in the fridge?
Stored properly in an airtight container, they stay fresh and tasty for up to one week. They might even last a bit longer, but for best taste and texture, a week is perfect.
Can I make these gluten-free?
Yes! Substitute the graham cracker crumbs with gluten-free graham cracker crumbs or crushed gluten-free cookies. The texture and taste remain just as amazing.
Is it possible to make these vegan?
To adapt this No-Bake Peanut Butter Cheesecake Balls Recipe for a vegan diet, use vegan cream cheese and a dairy-free chocolate alternative. Just ensure all ingredients are plant-based for the best results.
Final Thoughts
Trying the No-Bake Peanut Butter Cheesecake Balls Recipe is like unlocking a whole new level of no-fuss dessert magic. Rich, creamy, and so satisfyingly peanut buttery with a decadent chocolate shell, these little balls of joy are perfect for any occasion or just a treat-yourself moment. Once you’ve made them, they’ll quickly become one of your go-to easy desserts that always impress. Give it a whirl—you deserve this delicious indulgence!
Print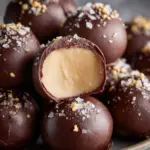
No-Bake Peanut Butter Cheesecake Balls Recipe
- Prep Time: 20 minutes (plus 30–60 minutes chilling time)
- Cook Time: 0 minutes
- Total Time: 1 hour
- Yield: 24 balls
- Category: Dessert
- Method: No-Bake
- Cuisine: American
- Diet: Vegetarian
Description
Delicious no-bake peanut butter cheesecake balls combining creamy cheesecake, peanut butter, and a crunchy graham cracker base, coated in melted chocolate for an irresistible easy dessert treat.
Ingredients
Cheesecake Mixture
- 8 ounces cream cheese, softened
- 1 cup creamy peanut butter
- ½ cup powdered sugar
- 1 teaspoon vanilla extract
- 1½ cups graham cracker crumbs
Chocolate Coating
- 10 ounces semi-sweet or milk chocolate chips
- 1 tablespoon coconut oil or butter (optional, for smoother chocolate coating)
Garnish (optional)
- Crushed peanuts
- Graham cracker crumbs
- Flaky salt
Instructions
- Combine ingredients: In a large mixing bowl, beat the softened cream cheese, creamy peanut butter, powdered sugar, and vanilla extract until smooth and fully combined.
- Add graham cracker crumbs: Stir in the graham cracker crumbs until the mixture forms a thick dough-like consistency that can be shaped.
- Chill mixture: Cover and chill the mixture in the refrigerator for 30–60 minutes to firm it up for easier rolling.
- Form balls: Once chilled, scoop small portions of the mixture and roll each into 1-inch balls using your hands.
- Freeze the balls: Place the balls on a baking sheet lined with parchment paper and freeze for 15–20 minutes to help them set and become firm.
- Melt chocolate: While balls freeze, melt the chocolate chips with optional coconut oil or butter in a microwave-safe bowl, heating in 30-second intervals and stirring until smooth and fully melted.
- Dip balls in chocolate: Use a fork or toothpick to dip each chilled ball into the melted chocolate, allowing the excess chocolate to drip off before placing back on the parchment-lined baking sheet.
- Garnish and set: Immediately sprinkle the coated balls with your choice of crushed peanuts, graham cracker crumbs, or flaky salt for added texture and flavor.
- Chill to set: Refrigerate the chocolate-coated balls until the chocolate hardens and is fully set, ready to serve.
Notes
- Store in an airtight container in the refrigerator for up to one week or freeze for longer storage.
- Use crunchy peanut butter instead of creamy for additional texture in the filling.
- Try white or dark chocolate chips as a variation for the coating to suit your taste preferences.
